Please see our Facebook page for the most recent items
www.facebook.com/redfieldroaddesigns

painted furniture, jewelry, antiques, and random handcrafted stuff ~ as well as fun DIY projects
Wednesday, July 22, 2015


Thursday, April 17, 2014
Mini iPad - Decoupaged Cover
I bought a pink cover for my iPad mini and decided that it was a little too boring and needed some color and pizzaz.
Here is what the plain cover looks like, it also had a frosted transparent back

Last year I painted some fabric and a plain manilla file folder and decided I wanted to decoupage it on for my new cover

I went to a local copy center and had my folder and fabric color copied with a laser printer - if you try and use a color print from a regular home printer the ink will smear when you add the decoupage medium.
It was .49 for each color copy - what a great deal!
I cleaned the cover with soap and water to get any dirt and residue off.
Then I marked the copies the the correct size and used a paper cutter to get straight lines. Then I rounded the corners with a corner punch and used a small circle punch to cut out the camera hole.


Next it was time to decoupage. I used Mod Podge Matte decoupage medium and put a thin, even coat on the cover (one at a time) and carefully centered the paper and pressed down to make sure the paper and glue had good contact.

I let this dry for an hour or so to make sure it was well dried. If you try to put Mod Podge over the top with out the bottom completely dry the paper has a tendency to buckle and ripple.
I coated the top with 2 coats of Mod Podge letting dry between each coat. I carefully went around the edges as well to make sure and seal them so there would be less chance of them lifting.
This is one of my favorite little projects ever!


Monday, October 28, 2013
Caramel & Candy Apples and Halloween Apothecary Jars
Here are some fun fall crafts I have been making.


Faux Caramel & Candy Apples
And Halloween inspired apothecary jars
Saturday, February 4, 2012
Valentine's Day - Heart and Banner
During a craft day with my sister-in-law, we each made a Valentine's Day heart - made with thousands of coffee filters, lightly sprayed it pink, added some fun themed ephemera ~ Finch playing cards, handmade rosettes, a hand stamped metal banner and finished it up with a pink ribbon.


Here is a 'Be Mine Valentine' Banner
I made the base of each banner section with sheet music. I cut the letters out of chipboard, then punched the chipboard out with a scallop punch and added a gun metal glitter. I made a crepe paper ruffle and topped it off with the letter.


Here is a 'Be Mine Valentine' Banner
I made the base of each banner section with sheet music. I cut the letters out of chipboard, then punched the chipboard out with a scallop punch and added a gun metal glitter. I made a crepe paper ruffle and topped it off with the letter.


Wednesday, February 1, 2012


Sunday, January 22, 2012
SOLD ~ Creamy White, Shabby Chic 4 Drawer Dresser $130
I painted this 4 drawer dresser, then sanded and glazed for a wonderful creamy white, shabby chic look - $130
This is a beautiful, unique piece that measures 32" wide and 17" deep and 43" tall.
The dresser has brand new knobs and has been sealed with a satin sealer.

This is a beautiful, unique piece that measures 32" wide and 17" deep and 43" tall.
The dresser has brand new knobs and has been sealed with a satin sealer.

Wednesday, January 18, 2012
Hershey Kiss Roses


Here are some 'roses' made with Hershey Kiss Candy.....a fun little Valentine's Day gift.

Wednesday, December 21, 2011
Paper Christmas Trees
Here are two Christmas Trees I made from books.
This tree is made from a book that has the cover removed, and then folded (I am going to make a tutorial on this in the future).


This tree is an Anthropologie-Inspired tree.


This tree is made from a book that has the cover removed, and then folded (I am going to make a tutorial on this in the future).


This tree is an Anthropologie-Inspired tree.


Saturday, December 17, 2011
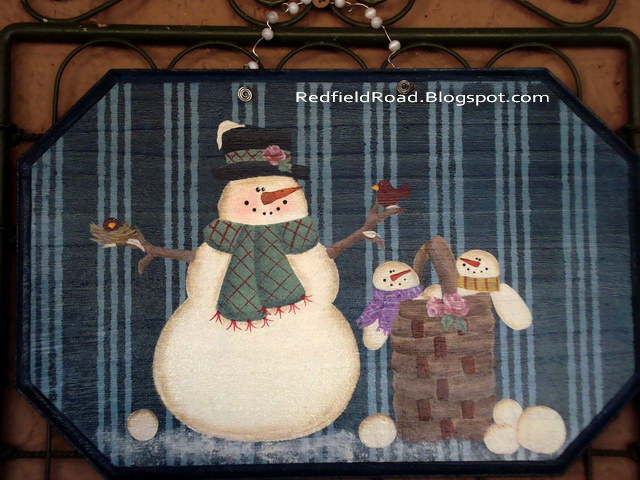
Snowman Signs
Here are some Snowman signs I painted....not all are typical Christmas colors, but that's what makes them fun!
I love roses, so I painted some snowman and added some yummy pink roses.


This sign has some pine boughs and holly berries - they almost look like you could pick them off and eat them.


I love roses, so I painted some snowman and added some yummy pink roses.


This sign has some pine boughs and holly berries - they almost look like you could pick them off and eat them.




Sunday, December 4, 2011
Snow Globes - Anthropologie-Inspired
Here is my take on the Anthropologie Snow Globes

(NOTE: I decided NOT to use any water in mine....I wanted to glitter my trees and that wasn't going to work if they ended up submerged in water. I also didn't know if they would grow mold or how long things would hold up in the water....I think it still gives the same illusion but with less mess!)
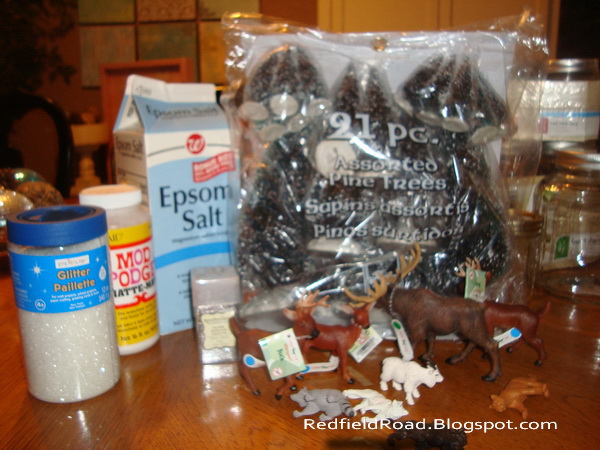
First gather your supplies...
* canning jars (1/2 pint, pint, quart) and cracker jars; wide mouth (Walmart)
* little christmas trees; 3" to 8" (21 variety pack at Lowe's)
* modge podge; I used matte - but gloss will work also (Michaels)
* silver glitter; I used Recollections (Michaels)
* crystal glitter; I used the CHEAP kind from the kids dept. (Michaels)
* epsom salt (Walgreens)
* animals; single or packaged sets in kids dept. (Michaels)
* paper or foam plates, glue gun, wire cutters (if trees need to be smaller)


Next, pour some modge podge on a plate and the silver glitter on another plate.

Now take the trees and twist them through the modge podge and then twist them in the silver glitter....add a little bit of glue if you only want a bit of glitter or add more glue if you want the glitter to be more noticeable - this is what I did - I liked the look of more glitter.


The tree on the left is glittered and the tree on the right is not glittered (I know the glitter doesn't show up too well, but you can see that it just adds a little bling to the ordinary tree - and who doesn't love bling!

Now go crazy and glitter up a whole bunch of trees - I did all 21 of mine - here are the few left I need to put in jars.
LET THESE DRY - preferably OVERNIGHT, but at least an hour or so, otherwise condensation may build up in the jar....if this does happen, you can always open the jar and let them air out.

After the trees dry, you may notice a few gaps in the needles - they kind of take on a life of their own and do weird things as the glue dries, but DON'T WORRY, by the time you put the trees together, add an animal and put them in the jars, no one will even notice.

Now is the time to assemble the jars....plug in your glue gun and start deciding which animals and trees you want in each jar. Some jars I used only trees, no animals; anything goes so get creative!
Make sure the tree will fit inside the jar...if it is a little too tall, use wire cutters and cut the bottom of the tree off (you may be able to just remove the white plastic base).
Use hot glue to hold the trees and animals in place, but make sure to NOT glue anything on the red rim of the jar lid (if the tree hangs over slightly that is fine, it will just get squeezed in the jar) otherwise the lid will not screw shut!

Now take the epsom salt and glitter adding some of each to the jar. I put about a 1/4" to 1/2" (total) in the jar (if you end up with too much or not enough, you can always open the lid and adjust the amount).


Take the lid and put in on the jar and screw it shut...you may have to squish the trees in...and make sure the writing of the jar is towards the back or you won't be able to see your cute little vignette!


Now shake them and get the 'snow' how you like it....I like it when the snow has drifts - higher in some places, rather than all at the same level.
Group a bunch of these together and ENJOY, especially since the Anthropologie jars are $38-$48 each!


(NOTE: I decided NOT to use any water in mine....I wanted to glitter my trees and that wasn't going to work if they ended up submerged in water. I also didn't know if they would grow mold or how long things would hold up in the water....I think it still gives the same illusion but with less mess!)
First gather your supplies...
* canning jars (1/2 pint, pint, quart) and cracker jars; wide mouth (Walmart)
* little christmas trees; 3" to 8" (21 variety pack at Lowe's)
* modge podge; I used matte - but gloss will work also (Michaels)
* silver glitter; I used Recollections (Michaels)
* crystal glitter; I used the CHEAP kind from the kids dept. (Michaels)
* epsom salt (Walgreens)
* animals; single or packaged sets in kids dept. (Michaels)
* paper or foam plates, glue gun, wire cutters (if trees need to be smaller)

Next, pour some modge podge on a plate and the silver glitter on another plate.

Now take the trees and twist them through the modge podge and then twist them in the silver glitter....add a little bit of glue if you only want a bit of glitter or add more glue if you want the glitter to be more noticeable - this is what I did - I liked the look of more glitter.


The tree on the left is glittered and the tree on the right is not glittered (I know the glitter doesn't show up too well, but you can see that it just adds a little bling to the ordinary tree - and who doesn't love bling!

Now go crazy and glitter up a whole bunch of trees - I did all 21 of mine - here are the few left I need to put in jars.
LET THESE DRY - preferably OVERNIGHT, but at least an hour or so, otherwise condensation may build up in the jar....if this does happen, you can always open the jar and let them air out.

After the trees dry, you may notice a few gaps in the needles - they kind of take on a life of their own and do weird things as the glue dries, but DON'T WORRY, by the time you put the trees together, add an animal and put them in the jars, no one will even notice.

Now is the time to assemble the jars....plug in your glue gun and start deciding which animals and trees you want in each jar. Some jars I used only trees, no animals; anything goes so get creative!
Make sure the tree will fit inside the jar...if it is a little too tall, use wire cutters and cut the bottom of the tree off (you may be able to just remove the white plastic base).
Use hot glue to hold the trees and animals in place, but make sure to NOT glue anything on the red rim of the jar lid (if the tree hangs over slightly that is fine, it will just get squeezed in the jar) otherwise the lid will not screw shut!

Now take the epsom salt and glitter adding some of each to the jar. I put about a 1/4" to 1/2" (total) in the jar (if you end up with too much or not enough, you can always open the lid and adjust the amount).


Take the lid and put in on the jar and screw it shut...you may have to squish the trees in...and make sure the writing of the jar is towards the back or you won't be able to see your cute little vignette!


Now shake them and get the 'snow' how you like it....I like it when the snow has drifts - higher in some places, rather than all at the same level.
Group a bunch of these together and ENJOY, especially since the Anthropologie jars are $38-$48 each!

Subscribe to:
Posts (Atom)